
Part 1 gave you a quick overview of the new Scheduler feature in Selenium IDE v2.9 along with my ramblings. In this part, I am going to show you how to work with scheduler jobs to run your test suites automatically.
When starting with the scheduler for the very first time, the quickest way to open the scheduler dialog box is by clicking on the scheduler icon on the Selenium IDE toolbar and clicking yes to the resulting prompt.
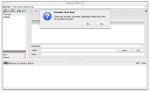
What happened was that you tried to turn on the Scheduler and it detected there were no scheduled jobs and offered to let you set them up. If you say yes, the scheduler dialog box will be opened with a new job ready for you to edit. Here is how it looks.

Leave the title alone for now and click on the Choose button next to the Suite text box. Using the Select test suite dialog that shows up, choose a test suite and click the Open button.
The suite text box will show the test suite you selected. The title will also be changed automatically to a title derived from the new test suite file name. When setting up a new job, this saves a bit of time. If you have edited the title yourself, it will not be overwritten. You can change the title and suite directly to what ever you like. If you specify an invalid test suite path, that job will have difficulties in being run and everything will stop until you click the error message. As an aside, there was a time, when the job would have been simply skipped. Now is not that time any more.
Now that you have set up the title and the test suite to run, it is time for specifying the schedule. The schedule portion of the dialog box contains a lot of check boxes. This portion contains check boxes in three parts, viz., one for days of the week, one for hours of the day and one for minutes. The test suite will be run every single combination of these three parts. In its default state, it will run the test every five minutes. Let us leave it as is for now. We are going to click the OK button, but before that, let me bring your attention to the check box just about the OK button. The Turn scheduler ON check box turns on the scheduler if it is checked or turns the scheduler off if it is unchecked. If the scheduler is on, it will run your scheduled tests automatically. If the scheduler is off, even if you have test suites scheduled, they will not be run automatically. This is useful if you are debugging your tests or doing test maintenance or creating new tests. If you are wondering why sometimes your test suites are not being run automatically, it is helpful to see if the scheduler is on or off. Now make sure the Turn scheduler ON check box is checked and click the OK button.
Once the scheduler has been turned on, the appearance of the scheduler button on the Selenium IDE toolbar changes. I cannot explain how it looks other than say it looks different. Take a look for yourself.

Now we wait for next five minute mark and see if the test suite ran automatically. If your test suite ran automatically, congratulations. You have just scheduled a job in Selenium IDE scheduler to run your test suite automatically and it was played successfully. If it has been more than five minutes and the test suite did not run, I have no idea why, report an issue on the Selenium Issues page and we can investigate it together.
When your test ran, you have probably noticed that the record button was turned off if it was on. You cannot play test suites automatically as well as record at the same time. You just cannot. No really, you cannot and you should not try either. If the scheduler is on, please do not try to record new tests or modify existing ones. If you do, you will lose your changes. Please be careful, remember that line in that movie, “With great power … ( … comes the ability to lose your changes)”. I hope to improve this in the next release of Selenium IDE.
This part was all about creating your first job to schedule a test suite to run every five minutes. In part 3, we will take a look at changing the schedule for the job that we have just created.